At Defcon32, Ironwood Cyber hosted a Zelda-themed CTF event that combined a physical badge and a mobile app game. The badge was able to connect to the game and allow for certain interaction as a sort-of controller. Most importantly, it’s one of the coolest badges I’ve ever seen. Like seriously, look how awesome the badge is:

The mobile app, which can be downloaded at https://ironwoodcybervalet.com/, is a Zelda themed puzzle solving and exploration game:

Unfortunately, if you don’t have a badge, you won’t be able to do much as the game requires connecting a badge to access most of the content. However, after reading this write up, you should have all the tools you need to bypass that check.
After connecting a badge and exploring, you quickly come upon the dreaded Obstacle Course. It’s a little platforming section that requires precise inputs and timing to beat and is extremely frustrating on touch controls. Here’s a clip of me doing some attempts just for the sake of this write up:
Since I wasn’t skilled enough to beat it legitimately, I decided on a different tactic: cheating Hacking!
Here’s what my obstacle course run looks like after doing everything in this write up:
Note: This entire write up is done using a Windows machine. The *Nix process should be very similar.
The Approach
Instead of doing the challenges the way they were intended, I went after an attack surface that I don’t think the IWC team fully expected: the game. Game hacking has become a major passion and hobby of mine. For the past 7 years or so I’ve been learning how to do all sorts of game hacking shenanigans, from ESP to teleporting or dumping sensitive data. If you’re interested in diving down this rabbit hole, I highly suggest checking out the Game Hacking Bible (https://guidedhacking.com/threads/ghb0-game-hacking-bible-introduction.14450/). The owner Rake is a bit wild but the content is absolutely top notch for going from zero to hero in game hacking.
A small side story, my dive into game hacking actually started because of several members of the IWC team. At a Defcon many years ago, we were participating in a CTF that had a game hacking challenge. I thought I could do it, so I spent hours tackling that one problem, only to end up not being able to solve it. But I learned a lot in those hours and kept diving after Defcon, and here I am today!
To beat the obstacle course, the goal was very clear: I needed a way to teleport to the end and skip all the actual obstacles. I knew from experience that if this was a PC game, this could be easily done using the popular tool Cheat Engine (https://www.cheatengine.org/). Cheat Engine is basically the swiss army knife of mucking around with games. It provides functionality that allows for direct memory modification of applications as well as helper tools to help find the specific memory addresses that need to be modified.
My first hurdle was that this isn’t a PC game, it’s an Android game. My first approach here was to try running the game in an emulator on my computer, but this fizzled out rather quickly. I was unable to get the game to actually run inside an emulator. I think it’s because it’s too new of a version of Unreal Engine on the game for emulators to be able to handle, but I’m honestly not entirely sure. All I know is I tried a few emulators and none of them worked so I began digging for alternatives.
I quickly found that Cheat Engine can actually run on Android phones, though not in the way I expected. Through the Android debugging tools, you can launch a Cheat Engine Server on the phone. Then from a PC you can remotely connect to the server from the standard Cheat Engine application. Once connected it functions exactly the same as it normally would on any PC game. It’s also really easy to get going, all you need is a rooted Android device! Which… I do not have. I have a Verizon Google Pixel, which thanks to Verizon being jerks, I am not able to actually root. After a brief moment of despair, I did more research and learned that you can actually do it on a non-rooted device, it just becomes a lot more involved.
Debugging the Android APK
The first step of Android debugging is to enable USB Debugging on the device. This requires enabling the Developer Options on your device and toggling on USB Debugging. Official instructions from Android for doing this for almost any device can be found at: https://developer.android.com/studio/debug/dev-options
The next step is to modify the APK so that the android standard debugging tool ADB (Android Debug Bridge) can interact with the application. This is a requirement for allowing the Cheat Engine Server to access the running application’s memory. Production Android APKs typically are not directly debuggable as there is a specific flag that has to be added to the application Manifest at APK build time that enables/disables debugging functionality. As expected, the IWC Adventure game is not debuggable out of the box. Getting it to a debuggable state requires modifying the APK.
Here’s what happens when you try to access an application through ADB that isn’t debuggable:
adb shell
run-as com.ironwoodcyber.iwcdc31
There are plenty of writes ups that go very into depth on reversing/debugging Android APKs (example: https://medium.com/swlh/reverse-engineering-and-modifying-an-android-game-apk-ctf-c617151b874c) so I’m just going to cover a generalized overview of the necessary steps to get the APK debuggable. If you just want to “do the thing”, skip on over this as there’s a quick method after.
- Pull the APK from the Android device using ADB (https://stackoverflow.com/a/18003462)
- Decompile the APK (can be done using apktool https://github.com/iBotPeaches/Apktool )
- Modify the AndroidManifest.xml file and add the debuggable flag
- Recompile the APK (again apktool can do this)
- Run the APK through a mandatory optimization step using a tool called zipalign that’s included with the Android SDK
- Android requires all APKs to be signed. Fortunately it’s really not picky about who signs it, as long as it’s signed.
The android SDK comes with two relevant tools for this: keytool, which generates a certificate and apksigner which uses the generated certificate to sign the APK. Almost every guide I found online uses jarsigner to sign the APK, but that’s all outdated and apksigner is the one you actually want.
Examples of using zipalign, keytool, and apksigner can be found in this StackOverflow answer:
- Deploy the APK back to the device using ADB
If this sounds like a lot to do manually, let me assure you that it is. I ran through all these steps multiple times trying to get it to work while sitting on the uncomfortable floor in a corner of a hotel room and was ready to pull my hair out. I did eventually get it to work through all of those steps, only to stumble across a silver-bullet automatic solution a few hours later: Objection.
Frida is a top-tier reverse engineering tool that is extremely powerful. I had used it for reverse engineering in the past, but never for Android. I discovered a tool called Objection (https://github.com/sensepost/objection) that’s used for Frida injection on Android. After messing around with it a bit, it quickly became the main way I interacted with the APK.
Using Objection to Modify the APK
Objection can be easily installed into a python virtual environment with:
“pip install objection”.
It requires having the Android SDK downloaded and the Android build tools in your system path. Specifically ADB, aapt, apksigner, and zipalign. The easiest way to obtain these is to download Android Studio and install the SDK through it.
Finally, it also requires apktool in the system path. Installation instructions can be found
here: https://apktool.org/docs/install/. I installed it to the same location as the SDK build tools.
Once everything is installed, it’s time to modify the APK! The documented process can be found here: https://github.com/sensepost/objection/wiki/Patching-Android-Applications
The first few steps involve getting the IWC Adv APK from the device. If you obtain the APK in some other method like using APKPure (https://apkpure.com/), these steps can be skipped.
- Get the name of the app (com.ironwoodcyber.iwcdc31)
adb shell pm list packages | FindStr iron
- List out the APKs for the package
adb shell pm path com.ironwoodcyber.iwcdc31
The game app actually has two APKs, base and split_obbassets. The obbassets APK contains all of the content (textures, models, audio, etc.) for the game, while the base APK is the core functionality.
- Retrieve base.apk and split_obbassets.apk
adb pull /data/app/~~Ks-_rx4opSNRvhIBYFc7Hw==/com.ironwoodcyber.iwcdc31-0_-baenxvTtegKwpgvoC6A==/base.apk
adb pull /data/app/~~Ks-_rx4opSNRvhIBYFc7Hw==/com.ironwoodcyber.iwcdc31-0_-baenxvTtegKwpgvoC6A==/split_obbassets.apk
- Patch the base APK using objection’s patchapk with the flag to enable debugging. This will also inject a Frida gadget into the APK, allowing Frida to connect to the app.
objection patchapk -d --source .\base.apk
- Sign both APKs using Objection’s signapk
objection signapk .\base.objection.apk
objection signapk .\split_obbassets.apk
- Uninstall the existing IWC Adv app from the device, otherwise it will complain about using new signatures.
- Reinstall the APKs back to the device
adb install-multiple base.objection.apk .\split_obbassets.objection.apk
- Confirm that the app is now debuggable by accessing it via ADB
adb shell
run-as com.ironwoodcyber.iwcdc31
Awesome, now we’re ready for Cheat Engine!
At this point, when the application is launched on the phone, it will freeze at the game’s logo screen. This is because of the Frida gadget that was added into the APK. It’s waiting for Frida to connect from the PC before progressing forward in the application logic. This can be done with Objection:
objection explore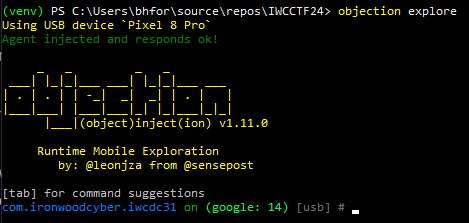
Once the prompt comes up the game should continue running like normal.
Running Cheat Engine
As mentioned earlier, to get Cheat Engine to work on Android, a Cheat Engine Server will be launched on the device that is then connected to from a PC. With the modified APK, this is fairly straightforward:
- Install Cheat Engine 7.5 (https://www.cheatengine.org/downloads.php)
- Download the Cheat Engine Server files (https://www.cheatengine.org/downloads.php, near the bottom)
- Push the downloaded ceserve75.zip to the device. Because this isn’t being done as root, the file needs to be sent to a location on the device that the application can access. Fortunately there’s a world accessible directory on the device at /data/local/tmp.
adb push .\ceserver75.zip /data/local/tpm
- Use ADB to run as the context of the IWC Adv app on the device
adb shell
run-as com.ironwoodcyber.iwcdc31
- Copy the pushed zip file into the app directory
cp /data/local/tmp/ceserver75.zip .
- Unzip the archive
unzip ceserver75.zip
- Add the executable bit to the ceserver that’s correct for your phone. For me, it’s ceserver_arm64
chmod +x ./ceserver_arm64
- Run the chmod’d ceserver binary
./ceserver_arm64
- The server is now running on the device on port 52736. The ADB tool provides functionality for forwarding ports between PC and Android device, which will allow us to access ceserver over the network.

- Make sure the game is running on the phone. Make sure it’s progressed forward enough to actual gameplay and not frozen on the logo waiting for Frida.
- Open the CheatEngine desktop application and click the “Select Process” button:
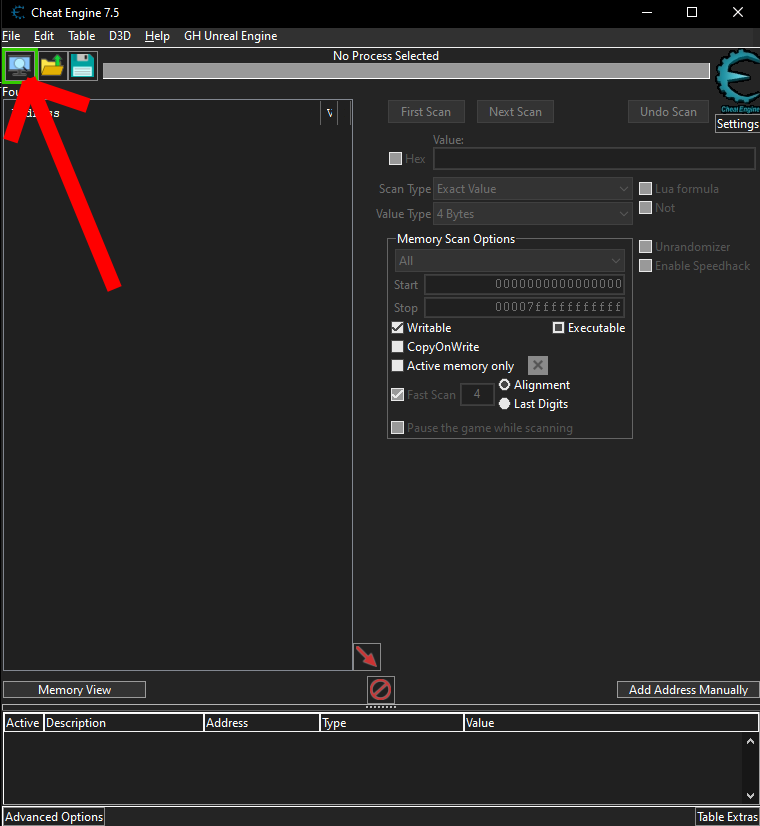
- In the pop up, select Network at the bottom.

- In the “Connect to server” pop up, put localhost for the host and click connect.

- If everything is working correctly, the Process List window should now show 3 processes. Click the one that says com.ironwoodcyber.iwcdc31 and click Open.

- Cheat Engine is now connected over the network directly to the game!
Doing The Thing
After all of that, we now have Cheat Engine (CE) running as if we were modifying a PC game. There are tons of tutorials on using Cheat Engine available online and about a million things it can do, so I’m only going to cover exactly what’s needed to start teleporting.
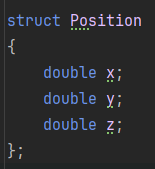
CE allows for scanning for arbitrary variables of arbitrary variable types. We need to find the memory address in the application that represents our current world position. Unfortunately we have no idea what this is as the application doesn’t tell us our coordinates. Fortunately, we can at least deduce the variable type that we’re looking for. Unreal Engine is open source and after a bit of digging I discovered that Actors have their position stored as an FVector of doubles. FVector, an Unreal type, is a struct with three members: x, y, and z.
The player’s position can be roughly represented as:
This is good news for us as it means we not only know the type, but if we can somehow determine just a single one of our coordinates (x, y, or z), then the other two coordinates should be very close to it in memory.
So we know we need a double, but we don’t know the initial value of it. Fortunately, as mentioned, we can do an initial scan of the entire memory space for an unknown initial value double:

This scan takes a while as it’s pulling everything that could possibly be a Double type out of memory for the entire application. This scan should give ~200 million address results, any one of which could be one of the coordinates.
Cheat Engine has the tools we need to refine these results down. By changing the Scan Type, we can filter the result set on new criteria. The strategy is to find a way to increase a value, then filter for “Increased Values”. Then decrease that same value and filter by “Decreased Values”. Maybe throw in a few “Unchanged Value” filters where the value is unchanged. Eventually, it should refine the results drastically. But first, we need to figure out which variable we’re targeting.
In Unreal, X and Y are the horizontal plane movements. As we run around on flat ground, it’s the X and Y coordinates that are being changed. Unfortunately we don’t know which direction for X and Y are positive or negative. This leaves Z, the vertical coordinate. The room we start in has steps we can climb, and tables we can jump on. This means we can easily increase and decrease our Z coordinate at will.
So the process becomes:
- Scan for an Unknown Initial Value double
- Jump on a table and filter results by “Increased Value”

- Jump back to the floor and filter by “Decreased Value”
- Repeat steps 2 and 3 until the number of addresses is a lot smaller. Throw in some “Unchanged Value” scans while not changing the Z coordinate as well.
Here’s a video of me going through this process. It’s not fast and it’s not elegant, but eventually it gets down to ~200 addresses.
With only 200 it’s reasonable to manually go through each one and set the value and see if our height changes. This is some risk of crashing the game with this step as we’re just stomping on arbitrary variables, but that’s half the fun! I tested with setting the address values to 5000.
When the address is finally found, it should look something like this on the device:
If anyone else finds themselves actually running through these steps, I’ll save you some time: The starting Z value when you initially spawn in is ~112. Filtering for around that value will drastically speed up finding the correct address.
After finding the Z coordinate, finding the X and Y coordinate is very easy. As mentioned before, they’re stored as a struct with the X/Y/Z variables all together. A double is 8 bytes big. So if we go back 8 bytes from the Z coordinate, we’ll get the address of the Y coordinate. 8 bytes more from there is the X coordinate. Here is adding them to them address list in Cheat Engine:
With X, Y, and Z addresses acquired, teleportation is unlocked! All that remains is finding the coordinates to teleport to for the Obstacle Course. It took some trial and error and a lot of falling through the world, but I found these coordinates to work well:
-5600, -3000, 320
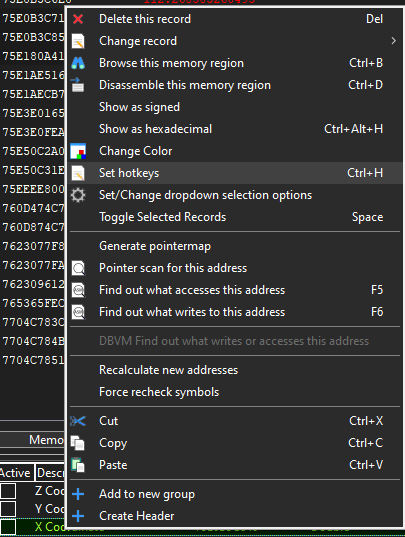
Cheat Engine supports using hotkeys to set values by right clicking on a saved Address and clicking Set Hotkeys:
I bound a hotkey of “Insert” to set each coordinate to the Obstacle End. This is the X coordinate’s:
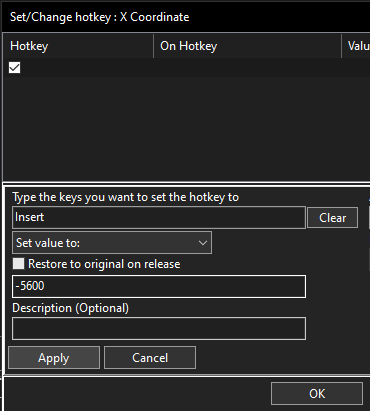
After doing the same for Y and Z for their respective end obstacle coordinates, just by pressing Insert on my keyboard, I get teleported directly to the obstacle course end. All I have to do is start the timer by running in, and then pressing the button!
Here’s what it looks like in the app:
I actually managed to get a new record of .084 seconds while recording that for this write up 🙂
The same exact process can be done for both for the Maze races, but you’ll have to find the coordinates yourself for those!